Much has been written about this channel, and the truth is that its advantages are more than proven:
- It is very economical and cost-effective and can be adapted to all budgets and needs.
- We can know precisely the ROI of each of our campaigns.
- Achieve a good conversion rate
- It makes it possible for us to get to know our customers better.
- We can segment our database (both by lists and by tags).
- It allows us to reach our customers in a personalized way, establishing a relationship with them and offering us the possibility of building customer loyalty.
- We can measure and analyze the results to maintain constant improvement
How to avoid the spam folder?
To get the most out of this tool, we must adapt to the times and offer our users relevant and interesting content.
In this article we told you how to optimize our Email Marketing campaigns; how do we now make sure that our mail does not fall into the spam folder? Here are 6 key points to keep in mind to avoid being considered as “junk mail” and some tools that can help us to avoid anti-spam filters.
Let’s get started!
1. Choosing a suitable subject
The subject of the message is the first thing that users will see, but also one of the keys to determine whether or not our message is considered spam.
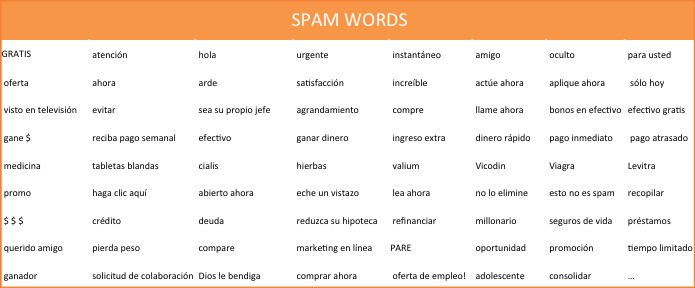
There are a multitude of words to avoid when choosing your subject line, such as exclamation points, lots of numbers and capital letters. These words are known as “spamwords” – do your best to avoid these words in your subject lines!
2. Always write with the consent of your subscribers.
It is important to have an optimized and segmented contact list for the efficiency of our mailings. So, no more buying databases!
Getting approval from the recipient of the email will reduce our chances of falling into the spam folder. We can do it in the following way:
- When the user is filling in their data to receive our communications, we must include the box “I accept the Privacy Policy and cookies”. In this way, in addition to complying with the Data Protection Law, we have a first consent from the subscriber to receive our Newsletters: they are known as opt-in subscribers.
- When a subscriber sends us his data, we can also send him an automatic message to the email address he has given us, by which he has to confirm that he wants to be part of our database. In this way, in addition to having the consent, we check that the email is correct: these are the Double opt-ins
We can also include in the subscription confirmation page that they add us to their address book. If we do this we will be sure to overcome most of the anti-spam filters.
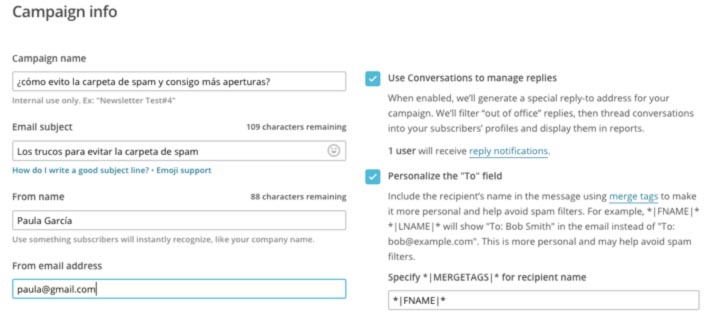
3. Customize the “Sender’s name” and “Sender’s address” fields.
Anti-spam filters try to avoid sending mass mailings. How can we avoid this filter? The best thing to do is to write our campaigns as personally as possible, as if we were writing to a friend.
To do this, what we can do when configuring our mailing is to use our name in the “From name” section, use a non-generic email(info@miempresa.com) in “From email address” and the subscriber’s name in “To“. This last point can be automated using the “mergetags” available in each of the email marketing tools.
And how is this going to help us? One example is Apple’s mail manager. It checks the sender name against the name configured in the user’s account: if it matches, the message goes to the inbox; if not, it goes straight to the spam folder.
Important: it is normal that your own campaigns that arrive from an ESP (Email Service Provider) to your inbox end up in spam. This is because your server detects that an external server is sending emails with your domain as sender. Since this is supposedly very difficult, it sends it to junk mail.
To avoid this, you should include the ESP’s IP addresses in your whitelist or “safe sender list”. An email whitelist contains the IP addresses from which users expect to receive legitimate messages. On each email server it is set up in a different but very simple way. It consists of adding the server to your contact list, and in this way all emails coming from their servers (test emails, reports, export contact lists…) will arrive in your inbox.
4. Avoid colored text
The text in color? Yes, it is advisable not to use green or red to highlight texts in the content of our newsletter. Colored texts, apart from sometimes making it difficult for the message to be read correctly, are not well received by the different mail servers and anti-spam filters, so let’s try to avoid them!
We have at our disposal other ways to capture the attention of our readers, such as bold text, call-to-action buttons, images… which can be much more attractive and effective.
5. Review the HTML code
This is important. There are a series of rules that we must take into account to avoid that our campaign can be considered as spam by the different email service providers (Yahoo, Outlook, Gmail…). Remember the following:
- The code must be clean, that is, it must have no lines of code left over. This often happens when we copy and paste the content of our message from a file. In addition, it is essential that all the elements are correctly closed with their elements </table>, </p>, etc…
- Images must include their corresponding alt=”image_description” tag. Including this tag in our HTML will also be useful when images are not displayed in the recipient’s email (because they are slow to load, blocked, etc…), as it will give an idea of the content that is not being displayed.
- Finally, there must be a good proportion between the amount of text and images in our newsletter, since including more images than text will be considered a negative element.
6. Configure the custom SPF
To make it easier for your campaigns to reach the inbox of your recipients and look more professional, it is also important to configure the SPF (Sender Policy Framework) customized for your account. This way you will simulate that the emails are coming from your company’s mail servers and not from the servers of Mailchimp, MDirector, Benchmarkemail or any other email marketing tool.
This feature requires a Manager level user or higher and requires changing certain account settings with your DSN provider. Roughly speaking, it will consist of copying and pasting certain information from your email marketing tool into your domain DNS provider’s site.
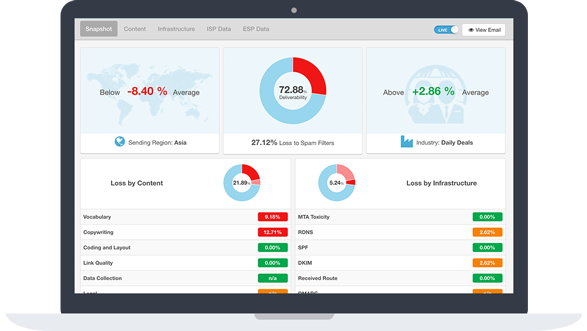
What tools can I use to check if my campaigns pass spam filters?
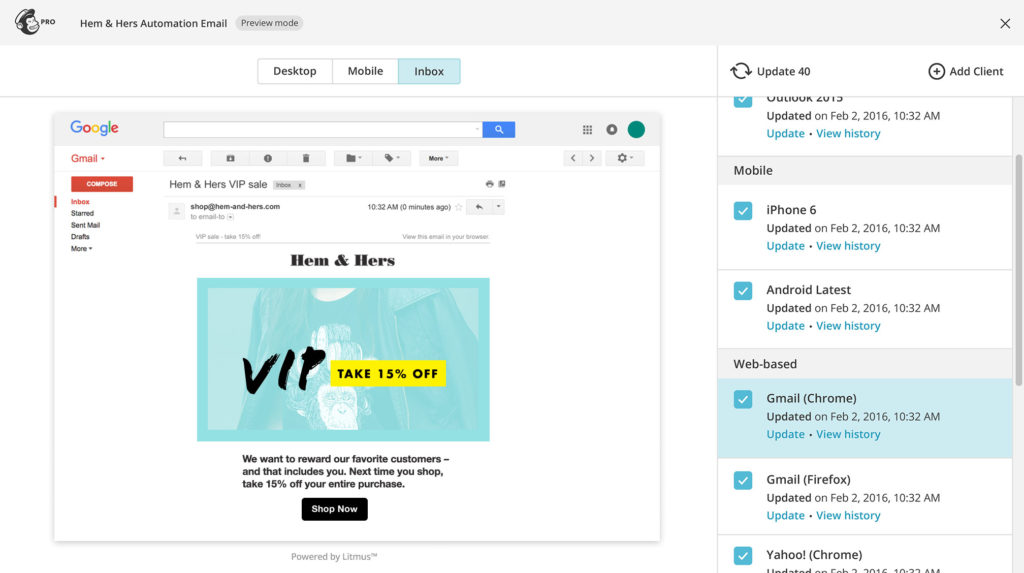
Inbox Inspection: this is a Mailchimp paid tool that checks how your campaign would look in different email providers (Yahoo, Gmail, Outlook…) and mobile devices without having to leave the campaign editor, analyzing the different spam filters.
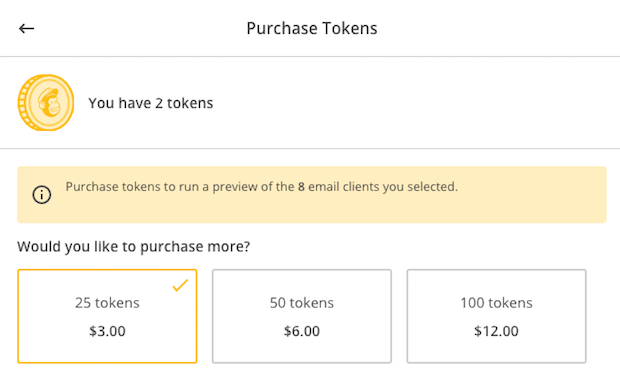
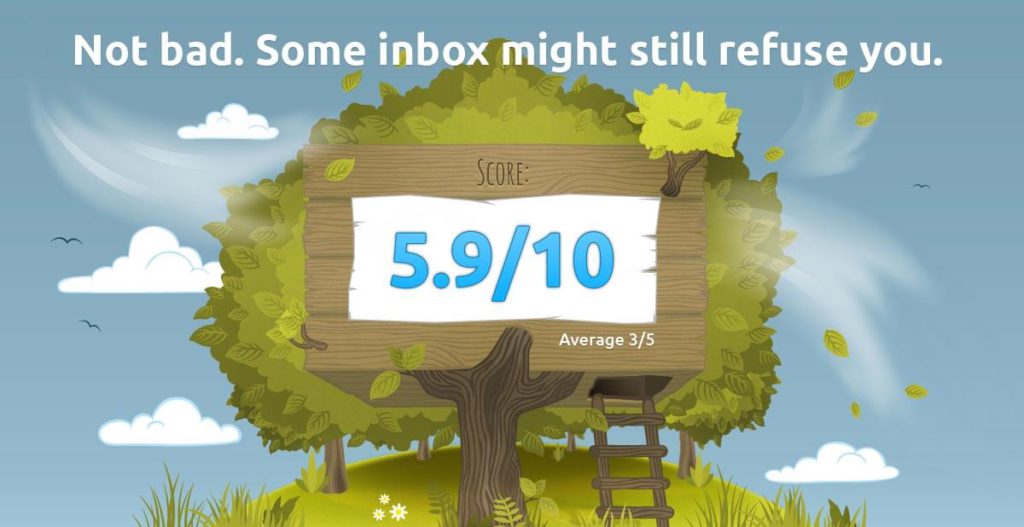
The paid version gives the possibility to access the visualization of more mail servers, desktop, mobile, or web through tokens (tokens).Mail Tester: this tool is free and performs an analysis of your campaign scoring it from 0 to 10. To do this you will have to send an email to the address provided and it will return a score on the level or degree of spam that may have your campaign, taking into account the following points:
- Analysis with Spamassassin
- SPF, DKIM, DMARC, Reverse Resolution Checks
- Verification of mail content
- Verification in blacklists
Sendforensics: this free tool analyzes and optimizes your campaigns before you send them. It is available in a free version.
Now it’s your turn
Despite everything we have said, keep in mind that there is no perfect formula to make your campaigns 100% efficient, and it is normal to have some emails that reach the spam folder and we will never know why. Dare to try to get to know your readers better, offering them relevant content and analyzing the results. Good luck!
If you have any other tips or questions, let us know in the comments.
Remember that we are experts in email marketing and certified in Mailchimp. If you need help, we will be happy to help you.